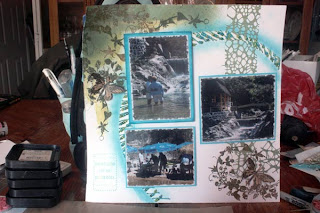
I am so very pleased with this layout. I love the way that it all came together portraying the bright vivid greens and blues of the surrounding sky and forests of this lazy little restaurant situated in the middle of a slow moving river and falls. Chino falls was like a bit of paradise and it is a place that I want to return to and savour again. Tim Holtz created a stamp that allowed me to recreate the vines and plant life and of course the butterflies.... were floating quietly through.
Chino Falls is just outside of Puerto Vallarta near the town of Mismolaya, it is sleepy and run down so I felt I needed to distress this layout a bit but not excessively. Bob and I were lucky enough to locate a tour guide that was willing to take us to this bit of paradise with 3 other couples from the ship.
You had to walk in about half a mile and then you could go through the restaurant where a mariachi band played for you..... done to the waters edge. Walk across the little damn and sit out on the sand bar. The water was so warm compared to what we have at home. I had to laugh and almost missed the shots when the group was startled by the minnows that were busy nibbling at there toes. It didn't hurt of course but if you weren't expecting it.........
The couple standing in front of the falls was completely oblivious to my taking their picture and it is one of my absolute favourite photos from that day. That night they became engaged but they didn't announce it until a couple of days later.
Well enough of strolling down memory lane.............. lets get on with the how to's of this layout.
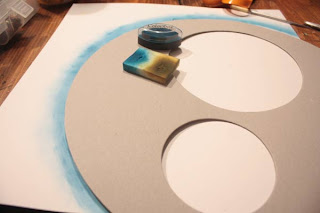
First of all you need some cardstock, and once again I have chosen Bazzil. I then chose to do the inking with Cats Eye from Colorbox. You can use any ink you like but be aware of the different properties and how they behave with what your working on. I chose the pigment because I wanted the delayed drying time to ensure that I could sponge it out to my liking......oh and I loved the color.
Of course you have already chosen your cardstock and ink colors to match your personal tastes. I have cut out of scrap chipboard a large circle and then kept the negative so that I could ink the opposite direction for the inside circle.
Place your template on the cardstock where you would like your finished circle to be on your layout. I use a makeup sponge to pick up the ink and brush it out ward over the chipboard and and extend it to the depth you would like.
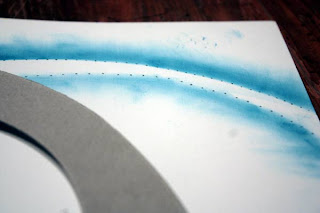
Using the inside edge of a circle template ink the inside like edge of the circle that you are creating. There is no right or wrong thickness for you to achieve. I do reccomend that you contemplate how your stitching will look. To thin and you loose the detail, to thick and you have lots of open space between stitches.
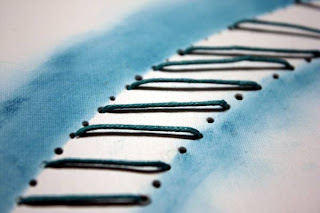
The next thing you want to do after you have finished inking in your circles is to place a computer mouse pad or sponge under the curves then take your poking instrument (needle or poker). Then poke your holes into the cardstock. The location of your holes depends on the design of the finished pattern you are hoping to achieve. In this case I made holes about a quarter inch apart on the outer ring. Then I put the inner ring holes so they were inbetween the holes of the outer ring. This resulted in me making the angled stitches of my pattern.
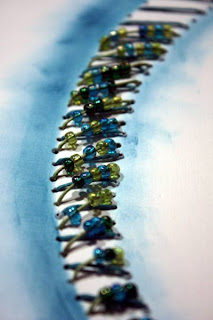
For this design I chose to do stitches in opposite directions with the each layer a separate color. As a rule if your going to add beads you would add it to the second or top layer. However, you should remember that rules are meant to be broken so have fun with your design.
I stamped using the Tim Holtz archival inks in black and sepia. Then used the Water Distressing Technique to add the blues and greens. Glimmer mist turned white netting the jungle green and Stickles turned the butterflys into sparkling gems.
How to Ink Shapes
 This is a post that had been requested by a friend of mine. She wants to know how to avoid ugly smudges or marks when doing her masking. First of all, whenever I do my masking, I always used a sponge. The sponge that you see in the above photograph is a cosmetic sponge where we would normally use to apply our wet foundation. It's triangular in shape. I've always dab the sponge on one edges into the ink. To mask, I've hand cut a self made simple template, place it on my card stock or paper with temporary adhesive. (I would advise that if your masking template is huge, use a temporary adhesive to hold it in place) (Tip: simply use a normal sticky tape and roll it in circle to create your own temporary adhesives)
To start masking, place the inked edge of your sponge on top of the template. This is to avoid too much ink on the masking. Using the portion after the edge to do the masking instead. This will soften the look of your masking and you will avoid any ugly marks. (Tip: Do not over dab your sponges with too much ink too.) I hope this will help any of my readers who also had the some problems while doing masking

5 comments:
Amazing tutorial - I'm so inspired with the stitching and use of beads. Thank you so much
Love this! Fab work on the stitching and bead work, looks amazing!
Great tutorial ...and beautiful page !!!
Really great tutorial! TFS!
Loving this...must take a while to add all those lovely beads but it sure makes it worth while when the project turns out so wonderful.
Now, get back to resting up girl !
Post a Comment